Sunday, 26 September 2010

Roof building time / Tempo para a construção do telhado

 After many moons of preparation - of walls, lime work, wood research and planning - it arrived, a truck load of eucalyptus wood from near Porto, 140km or so away. With this + one experienced carpenter, our main house roof began.


Carlos, the local Hulk, nudges this half tonne
beam and lets the block and tackle
take the rest of the weight.

Day 1, wood arrives and sits like heavy lumps on the ground in front of the house. I expect a day of phone calls for cranes and heavy lifting gear (after having seen João, the stonemason, use his mechanical claw to move stone all around).

These guys are different – they use a block and tackle. A “Garibaldi”. A pulley with gears. They built a super basic frame higher than the first floor, and dragged the first 8m mega-beam up to it, then hoisted it with this simple yet life-changing little device. From the 1st floor they did the same thing up to the roof, and within an hour the first beam was sitting there, all warped and imperfect, waiting. 


It was incredible to see how quickly they worked. By the end of day 2 they had created the skeleton of a roof, made from enormous bits of green wood (let it go dry, it's impossible to work they say).
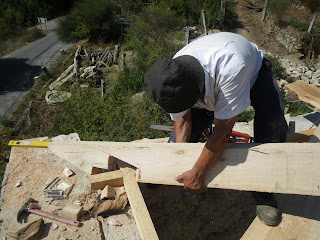
Manuel, lead carpenter, 40 years experience,
lining up first beam to go on the roof

They work with no plans or drawings. The list of materials they ordered was done standing in the empty house, pionting at corners and spaces in the air, pulling figures from their volumes of experience. “8m beam there, 64 rafters to cover both main roof elements, a truss here, and supporting beam there” and so on. Jorge, Mr Sawmill, was there scribbling notes as Manuel fired out instructions. They ignored me and my irrelevent questions.

When it's time to join the wood together Manuel whips out his electric chainsaw, sharp as a needle, and cuts shapes, based on how the wood sits beside another bit. He may draw a pencil line, he may not. A few whacks with a mallet and chisel to clean it up. And boom, it slots into place like it was meant to be. A couple of massive nails to keep it in place and it's hard to see how that roof isn't going to stay in place for centuries – as long as we keep the water out.


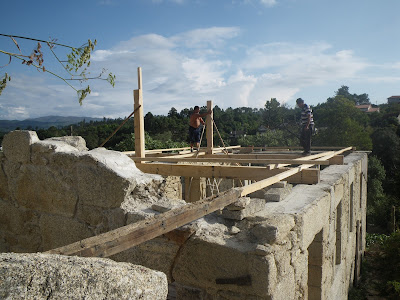
Day 2 or 3. Main uprights going into place. How they figured out what height these should be at I have no idea.
Without drawings they must have done it by eye, or rule of thumb, based on the width of the main beams crossing
the breadth of the building, which are about 8m long.  Lenght ways, the building is about 16m long. 

a;lksdf


Piecing it together

Carlos, whacking out some indents to house the angled trusses.

Temporary brace for the end of roof... Hoping there's
some kind of longer term plan for that one!
adsffasdfsdfa


Ilie understandably worried at this stage. 


By day 4 or 5, looking more and more roof like...


What am I doing here?

Nikita in the thick of it. Learning.


First he cuts, then chisels

Then checks 

Then slips it into place. Nice


This is the only hip-roof we're going to have on the building (alternative to a straight, gable end).


More massive wood, oak this time
to hold up East side of roof. 
And floor beams, almost 6m long, 30x20cm size
for the kids bedrooms floor...
Roof coming over this next. 


I have been amazed by the skills and confidence of this guys. I ask them if they have any young 'uns coming up behind them, learning their trades. They laugh, regard me as retarded, and explain that no young person wants to do this sort of thing. "People want to learn to design things on computer, not here for real, where it's hard work, takes years to learn". For sure, this isn't something you could pick up in a year or two. It's an art, a lifetime's work.  And not particularly well paid.

"anyway" they add "everyone builds their roofs with cement these days".  This is a whole other issue, based on a little common sense and no doubt serious financial gain for a few individuals in charge of the concrete industries.  But how could the entire architectural and engineering professions have been sold out so easily?

Here's the story:


Why cement? Because they are “resistant, waterproof, strong, long-lasting, cool in summer, warm in winter” (quotes from local builders, home-owners). As they have only been built in this way for the last 30 to 50 years they don't yet know the results of this national experiment. In the UK, many buildings made with cement have started to deteriorate within a 30 to 50 year time span, due in part to the inevitable cracking of cement floors, foundations and walls – cracks that allow water to come in, and eventually cause damp within the building, rotting of any wooden elements and so on.

But cement in roofs never really took off in the UK – or France, Germany, the US and most other places for that matter. This means we don't really have a precedent to measure it against. It seems mighty popular in Spain and Portugal so this should be the area to watch. Here are some of the down sides I can imagine with cement roofs:

  • Non-breathability. Cement doesn't let moisture pass through, so it can't “breathe”. A bit like a plastic bag. It keeps the rain out, sure, but it also keeps the moisture in. And if you think about how much moisture we generate in bathrooms, kitchens and just breathing around the house... We would need a fairly sophisticated ventilation system to allow all that water vapour out, without letting in too much cold air.

  • Money. I have yet to find out how much it costs, per square meter to build a cement roof, but I'm fairly sure it's more expensive than wood. Though that depends what kind of wood you choose. We'll get to that later.  

  • Carbon Factor. We now know that to produce 1Kg of cement you will emit 1Kg of carbon dioxide into the atmosphere.  Multiply this into the millions and you're talking a fairly major chunk of your national CO2 diet. In fact, buildings in Europe are responsible for around 40% of its emissions. So, you want to cut emissions, why not start there, in the building products themselves ? It really is a no-brainer. Trees are like solar panels: they grow with a happy combination of sunlight and water.  Cut them down to make houses and plant more, plant twice as many.  Make forestry a part of the building industry. Use local timber, not imported stuff from Scandanavia and you cut emissions further.  Learn how to use local wood. Get young people learning about this stuff and you may just reduce carbon emissions.  Or just screw the planet and build with cement. It seems there's overwhelming pressure around us is to do just this -  so many people make so much money from the status quo.  Why change it? 
I had better leave it there, lest I rant. 

Monday, 20 September 2010

Stone building, all summer

Since May it has been stone stone stone on the main house. With João Camula, of Granitos Camula, as our stone mason, wall after wall was taken down, rebuilt - using stone on site and a few imported from nearby. We used hydraulic lime and sand as the mortar in every case. Here's how it has progressed on one of these walls, in June.

Picking apart a wall. They carried on taking it down to ground level.

João and Amançio getting the first stones into place for the new wall


View from inside, where the stairs will be built,
one day, from ground to first floor.
Day 2 or 3, new wall coming along. New door decided upon
as well:)


Wall completed, as seen from the
East side of Adega, with new handy shelf thing integrated.


Same wall from above. So here you can see the adega
section from West view.  Timber frame and straw bale walls
to follow, hopefully in October. 

Sunday, 5 September 2010

A wall of straw and clay / Uma parede de palha e argil


The Alambique - timber frame and windows (from Jon and
Mary in Scotland!). Shuttering below to hold the straw-clay.
August. Summer flying by, progress on main house painstakingly slow. We need to move in, somewhere at least. Focus moves to the alambique, which we'd planned to move into while finishing the main house.

We've been working on the walls, floors, roof, plumbing, drainage, power supply since May. Now we needed a front wall. We have a few choices for wall material: bricks and mortar, earth bricks, timber frame with plasterboard and insulation slabs, and so on.

Nikita as Paulo's carpentry assistant, building the timber frame.
Note the stone wall built below the timber, to keep straw and wood
well away from any water.

We wanted a wall that would retain as much heat as possible inside, during the winter, would not cost too much, would be breathable (allow moisture built up inside to get out).  So we chose light earth building whereby straw and clay slip are rammed into formwork (shuttering).  Used for centuries in various parts of Europe presumably because it was cheap, used locally available materials and provided good insulation.


The clay takes loads of time to soften up, at least 24 hours. Then it needs whisked, then then the slip decanted into another container.

Paulo, surrounded by clay slip buckets, showing our Galician
friends the right mix of clay to straw, in Donald's old bath. 
Federico on clay stone crushing duty
What we didn't realise was the enormous amount of time the whole process would take. Making of clay slip alone is a fair bit of work, which needs constant attention. I found a source of fairly pure clay from a local brick factory in Galicia (10 mintues away). Cheap, certainly (25 euros a tonne).

Irena, Cesar and Jorge working the clay slip into
the straw. 


Then you need to have at least 2 people fluffing up the straw in a container of some sort. On bigger projects people have all sorts of equipment to do this, but these are not available here in Portugal, and if they were they would cost a fortune to rent.

Bugui, Galician yoga and meditation teacher, working with
the Zen of Straw
Cristina, recent Galician resident from Italy, adding her labours
to the wall compaction. 
Next, moving the straw-clay mix to the shuttering and tamping it down. Here, according to research by Salvatorre Gangitano (Dhanya) who kindly forwarded me his essay on light earth construction, says that if you press it in too hard you loose insulation, and have more of a thermal mass wall. If you leave it too loose, better insulation but the possibility of air gaps, and limited thermal mass.


Once the wall sections are done you can remove the shuttering right away. What you have is a damp walls of clay. Looks nice, it's straight and ready for plastering. But not for months! Here's another disadvantage: it takes up to three months to dry properly.  It's been 6 weeks since we built this wall and it's been really hot, so it is almost dry inside. But in colder climates this could be a real problem, mould can occur and delays in the building process can cost a lot.


Irena, great friend from Northern Galicia, and child (still at one with her)
one of the hardest workers on site. Impressive.

Paulo with first 3 straw bales, re-cut. Did we save time? Not sure,
because recutting them and notching the bales around the posts
was also a fair bit of work. But a definate benefit was the lack of
additional moisture. Bales are dry, ready to plaster right away. 
After a while we realised it would be quicker to fill the larger sections with dry straw bale, cutting the strings and retying them.

Me, driving ash stakes
through the bales to keep
them stacked in place.

We stacked bales all the way to the top then compressed them down with our van jack, then stufffed straw-clay in the remaining space.


OK. What about thermal performance? Dhanya's research found that the U-value of a 40 cm straw-clay wall can be around 0.239 W/m2K (this refers to the U-value, which is a measure of energy conduction, in watts, per square meter, conducted through a material, for each degree difference on each side).

How does this compare with other types of walls? Well, here's a selection, taken from the Whole House Book:

Wall type                           U-value
Solid brick  (225mm)         2.20
Timber frame with
50mm insulation                 0.96
Timber with 100mm
insulation                            0.35
Our straw-clay wall    
(maybe?)                            0.23
Superinsulated house
with 250mm insulation         0.14
Straw bale wall                   0.13

    
The latest UK building codes state that external walls must have a minimum U-value of 0.35 (W/m2K), which means straw clay/ light earth would be considered more than acceptable.

Overall, we are not that impressed so far with straw-clay as a system. It is so labour intensive that this can increase the cost of the job. And it takes a long time... Also, the problem of waiting for it to dry out enough before plastering  means that it could delay a construction.  A few mice have also moved in...

That said, now the wall is done and almost dry, I think it's going to perform well. But we'll have to see after plastering, and after a winter of rain and cold.

Petrus, building up stone wall in front of the alambique where
we plan to build a wooden structure for a veranda.  More on this later.